
Wyze is known for affordable devices that often compete with higher-end products. And the $99 Wyze Cam Floodlight is a prime example. In fact, it uses the well-tested Wyze Cam and pairs that with a bright floodlight.
It’s available now from Home Depot, and we’ve spent well over a week putting all facets of it through the wringer, including the two spotlights, siren and camera quality. It ultimately makes watching over a driveway, backyard or really anywhere seamless. Let’s dive into why.
The who, what and how
Who this is for: The Wyze Cam Floodlight is for those who want to add an extra layer of security and peace of mind to their home without spending a lot of money.
What you need to know: You’re essentially getting a floodlight accessory and the Wyze Cam V3 bundled together for $99. It’s a much less expensive setup than the $249 Ring Floodlight Cam Wired Pro or the $279 Nest Cam with Floodlight.
How this compares: Not only is the basic hardware cost lower than the competition, but so is the monthly subscription. Wyze Cam Plus comes out to be $15 per year when billed annually, per camera, while Ring Protect is $30 per year for one camera or $100 a year for unlimited cameras. Nest Aware’s basic plan costs $60. However, you can still get continuous recording for free on the Wyze Floodlight Cam by adding a microSD card.
2 lights, a siren and a camera
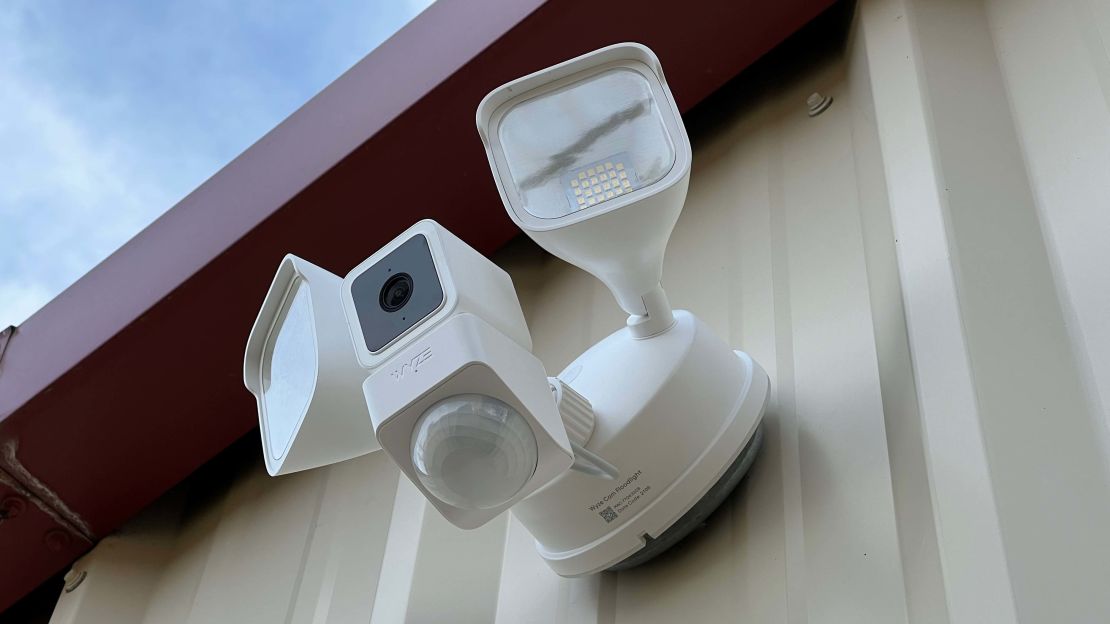
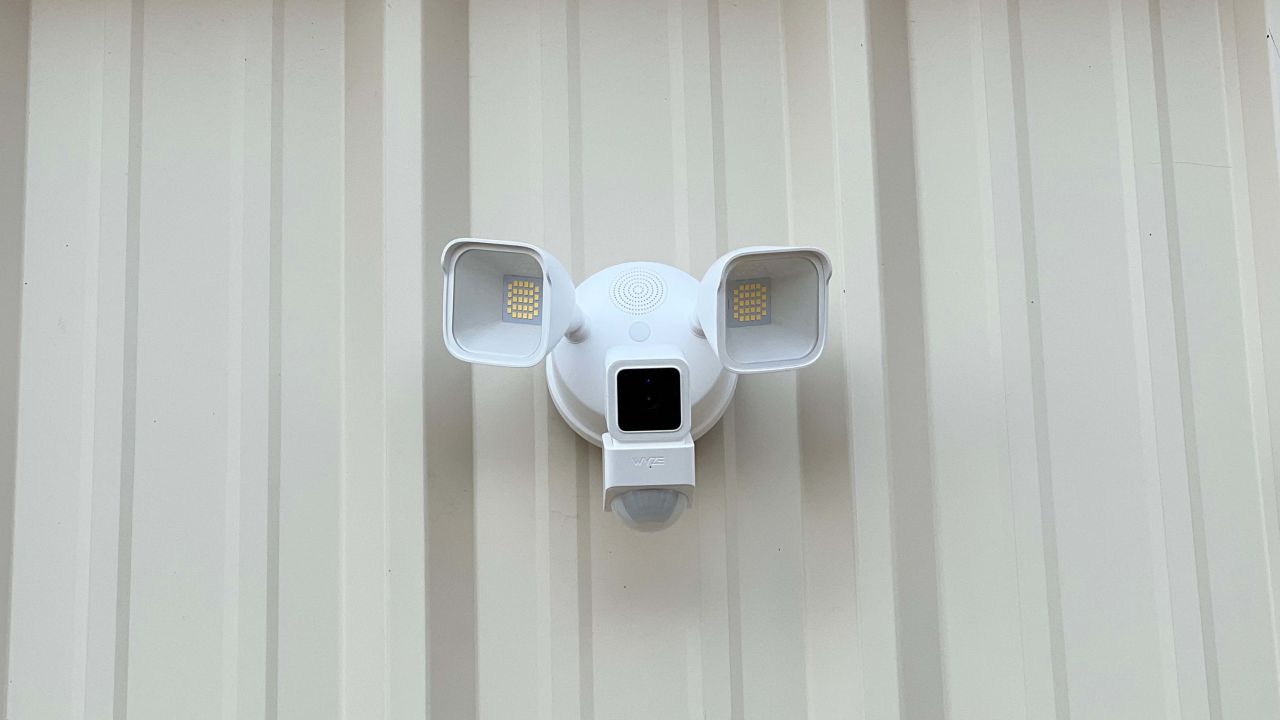
The Wyze Cam Floodlight isn’t the best-looking floodlight we’ve installed or tested, but it’s not exactly ugly. In fact, the Cam Floodlight is essentially the Cam V3 on a floodlight accessory — Wyze didn’t do anything, really, to hide this fact. Hopefully the company eventually starts selling the floodlight on its own, sans camera, for those who already own the camera.
Upon unboxing the Wyze Cam Floodlight we realized the brilliance of the floodlight’s design, though. In the middle of the housing is a flat platform that has a Wyze Cam V3 attached, with a motion sensor below it. On either side of the camera is a 2,600-lumen light. Better yet, these components come off the floodlight’s housing to display the?speaker and all of the necessary wiring.
The Wyze Cam V3 is also not locked in a fixed position but instead on an adjustable stand. This means you can lift it up and rotate to ensure your shot is framed properly.
The included camera is wired into the floodlight’s housing, next to the passive infrared (PIR) motion sensors. But there’s an added bonus in that same housing: an extra USB port that’s available for you to add an extra Wyze Cam V3. The port will provide enough power for the camera, allowing you to cover more area with Wyze Cams off of a single power source.
Installation and setup

Wyze is kind enough to include basically everything you’ll need to install the floodlight — except for a ladder and an electric drill or screwdriver — in the box. Just like all smart home products that are hardwired into your home’s electrical grid, it’s a good idea to do your research and only install it if you feel comfortable messing with electrical wiring. We’ve done this plenty of times and have no issues swapping out a light fixture but understand that some are hesitant to do the same.
Wyze has a helpful video that walks you through the installation process, step by step, that you should watch before making a decision about going it alone or hiring someone. If you do decide to go the DIY route, the Wyze app walks you through the installation process with step-by-step GIFs.
It took us about 10 minutes to swap out the Nest Cam with Floodlight for the Wyze Cam Floodlight. Once the installation is complete and power is flowing to the floodlight, you’ll finish the setup process in the Wyze app.

Before you remove the ladder and put your tools away, it’s a good idea to finish the setup process in the Wyze app. We didn’t realize before we installed the camera that the app has a setup guide built in, walking you through each step of the installation process — a pleasant, and warranted, surprise. Part of the process involves connecting the camera to Wi-Fi and ensuring that the camera’s view contains everything you want.
The final step we suggest doing before taking the ladder down is installing a microSD card on the bottom of the camera so you can use the camera’s continuous recording feature. Otherwise, the free storage plan means any captured motion clips will be limited to 12 seconds and stored by Wyze for two weeks. With a microSD card, your camera will constantly record and store your video clips locally on the card.
Temper your expectations, but not too much
It’s important to remember that even though the floodlight itself costs $99, it’s using a camera that at one point was sold for as little as $20. During the last year or so, the company has had to raise prices nearly across its entire product lineup during the pandemic.
Why? Because the Wyze Cam V3 stand-alone camera is good but not great. And by extension, you’ll have nearly the same experience with the Wyze Cam Floodlight. That’s not to say the 1080p videos and pictures aren’t clear — they very much are — but they lack an overall sharpness that we’ve experienced in higher-end cameras. But that’s all to be expected at this budget price.
The Wyze Cam V3 captures 1080p video, has a 130-degree field of view and features an infrared night mode, along with a full-color night mode. We actually took a few extra days reviewing the floodlight because we noticed most of, if not all, of our nighttime videos were captured in black and white instead of color and we weren’t sure why. Ultimately, we discovered that any video that’s recorded as part of 24/7 monitoring to the microSD card will default to infrared, or what looks like black and white. However, the moment the floodlights are turned on and there’s enough light visible to the camera, it switches to color.

One setting we had to spend some time fine-tuning is motion sensitivity. We noticed the floodlights, which were plenty bright enough to light up our backyard, turned on every few minutes or so. It was far too often, especially when we took into account that lights of cars driving down the road on the other side of our house were often the culprit. After adjusting the motion detection sensitivity the lights turned on less often. All of these adjustments are made pretty effortlessly in the Wyze app.
When it comes to alerts, you have a couple of options. You can sign up for Wyze Cam Plus for $1.25 per month, per camera. It’s billed annually, costing you a total of $15 before taxes. For that, you’ll get unlimited video length for motion clips, fast-forwarding features and, more importantly, object sections for people, pets, packages and vehicles.
That’s one of the cheapest single-camera plans you’ll find for smart home security cameras, but it can quickly add up and exceed the cost of plans from the likes of Ring or Nest when you start adding multiple cameras.
A Cam Plus subscription isn’t required, but it is something we’d recommend getting if you’re installing the floodlight in a heavily trafficked area. While the addition of a microSD card to the Wyze Cam will give you access to more video history, you’re going to miss out on motion alerts and object detection.
Bottom line
The Wyze Cam Floodlight is an inexpensive way to add peace of mind and security to your home. At $99, you’re gaining a smart floodlight with the potential for two cameras. We strongly recommend getting a microSD card to take full advantage of the camera’s recording features as well.
You’re not going to get the same high-quality video or full-featured app as you will with options from Ring or Nest, but you’re saving yourself a lot of money.


